
Guide:Wrye Bash

Wrye Bash
A simplified guide to using Wrye Bash to maintain a modded Step setup
by: Step Modifications | Forum Topic
NOTE
Please be aware STEP now exclusively supports Mod Organizer for the STEP Guide and modding. As such, some of the information in the following Guide might be outdated since it is not being actively maintained on a regular basis. However, Wrye Bash can still be used for STEP but the Guide will no longer have instructions exclusively for Wrye Bash users as it did in the past.Introduction[edit | edit source]
Wrye Nomenclature[edit | edit source]
Wrye was a prominent TES (The Elder Scrolls) enthusiast, modder and developer that created Wrye Bash as a tool to help other modders deal with the idiosyncrasies of modding for Oblivion (TES4). Wrye also later created an implementation that he called Wrye ‘Mash’ for Morrowind (TES3). Wrye Smash is simply Wrye ‘Bash’ implemented for Skyrim (TES5), so it IS Wrye Bash. For the sake of brevity and consistency, this guide will henceforth refer to Wrye Bash as ‘WB,’ and its analogues will likewise be referred to as ‘WS’ and ‘WM’ for Wrye Smash and Wrye Mash, respectively.
Purpose of This Guide[edit | edit source]
This guide assumes that the reader has reviewed the most updated relevant documentation now packaged with the WB program. If that is not the case, the authors strongly encourage a review of that documentation. Understanding--in a basic sense--what WB does and why it is useful are important concepts providing a context necessary for the reader to maximize the benefit of using this guide with respect to a fresh install of the most current major STEP release. Additionally, the guide will be modified and updated to reflect ongoing changes in each forthcoming major release of STEP. The novice WB user will likely find substantial value in following the guide as an actual working example of several sound techniques for implementing WB; nevertheless, much of the material covered in the following pages will be best understood with a baseline level of experience that exceeds “null” by at least a small margin, please familiarize yourself with the program before getting started.
Background - Basic Modding Principles[edit | edit source]
As with all TES games, modding Skyrim--in the most raw sense--can be accomplished by simply placing compatible files within the Steam/SteamApps/common/skyrim/Data/ directory (henceforth, referred to as “Data directory”). These files usually come packaged as a “mod” in an archive that facilitates simple decompression into the Data directory. Due to the vast number of mods and their incredible variety, the task of manual extraction and installation is a tedious process with lots of potential for error. Furthermore, it is difficult to “undo” what has been done, since it is difficult to keep track of the source of each file as the number of mods and files in the Data directory increases. One must take care to read each mod’s documentation to understand exactly what it does and how it does it in at least a very general sense. Why? Because it is important to create a customized Skyrim that suits the tastes of the individual modder. Strictly defined, two mods are compatible if they do not attempt to alter the same game variable. Likewise, two mods that affect the same game variable are strictly defined as incompatible, which is more often termed a conflict. Said variable could be a mesh or a texture as well as a plugin or INI file. Even a game setting affected by a plugin while also being altered by an INI setting or a configuration script represents a conflict. Under the strict definitions of mod compatibility and conflict, many mods are incompatible and thus, have conflicts. Fortunately, this is usually not really a problem, because most of the time, a conflict is inherently resolved by one mod “winning;” that is, one mod overwrites or overrides the other. For example, two particular versions of a texture file could attempt to occupy the same logical space in the Data/textures directory, in which case the second texture to be written to that space during installation will naturally overwrite the first. This is called a resource conflict. On the other hand, if one of those texture copies resides in a compressed BSA while the other exists as a “loose file,” then neither will physically overwrite the other upon installation, but rather one will override the other in-game upon execution of Skyrim. This is called a data conflict (also referred to as a load-order conflict).
The STEP Solution[edit | edit source]
One can spend hundreds of hours just searching for mods before actually getting down to the business of installing them. As mods increase in number and complexity and mod creators produce more and more mods that alter game play, interface and settings, the probability of game-crashing conflicts increases. The STEP project takes care of the heavy lifting associated with sifting through thousands of mods and selecting the ones that significantly enhance and improve the vanilla experience without detracting from it with as little cost as possible in terms of performance. Users are able to follow TheCompiler’s detailed, step-by-STEP manual-installation instructions and be confident that all components have been individually tested by the community and the results verified. STEP also facilitates customization by providing details of changes affected by each mod so that the user can choose to omit or change the order of STEP’s’. This cuts down on a vast amount of time and headache dealing with sampling, testing, troubleshooting, etc.
Limitations of STEP[edit | edit source]
Regardless of the huge time savings, efficiency boost and piece of mind that STEP offers, it is still a large manual process with many, well … steps. It can therefore take awhile, and problems can and will occur for many users with increasing frequency as mod numbers and complexity increase, so STEP will only go so far to reduce the job of maintaining a viable setup with each new mod or mod update. In order to allow better scalability of STEP as it evolves, it is necessary to simplify and condense the procedure into more manageable components. Mod managers help in this regard by keeping track of files installed and package installation order. In particular WB enables the most configurable interface for mod management, and is thus the recommended choice for installing, configuring and maintaining the STEP setup with each new alteration in the mod configuration.
Pre-installation[edit | edit source]
WB is not just simply a mod manager but much, much more. Like other mod managers, WB keeps track of mod packages as well as file sources and installation priority; however, WB goes far beyond this, some of which will be demonstrated throughout the rest of the guide.
Set Up Skyrim & Supporting Software[edit | edit source]
A much more comprehensive and in depth guide is available Skyrim Installation Guide.
Establish a Clean Skyrim Install[edit | edit source]

A clean Skyrim install establishes a baseline from which to begin the STEP installation procedure. The simplest way to ensure a clean Skyrim install is to delete all loose files (not directories) from the skyrim/ directory (parent to Data directory), followed by cleaning out all files and directories from the Data directory (Figure 1). Once complete, open the Steam Libraries view, right click on Skyrim and select [Properties]. Click on the [LOCAL FILES] tab, then click on [VERIFY INTEGRITY OF GAME CACHE...]. This will restore any missing files whilst avoiding the time-consuming and redundant download of the large files listed above. If there is any uncertainty, uninstall and then reinstall Skyrim from scratch to this point.
Install File-Compression Software[edit | edit source]
Almost any file-compression software can be used to view the contents of packages. 7-zip is favored by the authors, because it can produce dramatically smaller files than the other formats and it recognizes virtually every compression format. It's also free, open-source, and supports most of the other common formats.
Install & Configure Wrye Bash[edit | edit source]
Install[edit | edit source]
- Download the Wrye Bash 306 (or current) installer from the Nexus.
- Tick [Skyrim] and [Standalone]. Installing the Python version is also valid, but that methodology will not be supported in future versions of this guide.
- Allow the installation of any dependencies if prompted.
- If the installer is having trouble finding Skyrim ...
- Exit the installer, restart Steam, and run Skyrim from Steam. Doing this will create the necessary registry entries required for WB to find the installation directory.
- If the installer is having trouble finding Skyrim ...
- That's it. WB is now very simple to install and keep up to date using the auto updater in the settings menu.
Configure[edit | edit source]
If no previous backup of bash.ini is available, copy and then rename "bash_default.ini" to "bash.ini," and place this alongside the former. The INI defines many useful things including where WB looks for installers. The following edits may be useful:
Under "[General]", uncomment the following lines and add in applicable paths (preferably to separate drives or directory locations other than skyrim/)
;sOblivionMods=../Skyrim Mods
;sBashModData=../Skyrim Mods/Bash Mod Data
;sInstallersData=../Skyrim Mods/Bash Installers/Bash
;sOblivionPath=G:/Steam/SteamApps/common/Skyrim
Read about the various options under [Settings] to determine if any of them may apply (recommend not changing these). To configure other applicable tools to be run via Wry Bash (from the bottom bar of the program window), uncomment pre-configured options under [Tools] and edit as appropriate for any of these applicable programs. Any custom program can be run from within WB by placing the shortcuts within the skyrim/Mopy/Apps/ directory. See the [General] section of a working bash.ini file as an example.
NOTE
The Python version allows execution of a debug batch file to ensure that everything is configured properly, all errors will be logged to "BashBugDump.log". Python-version users will also need to create a shortcut to "Wrye Bash Launcher.pyw" and move to a convenient location (like the Desktop or Quick Launch bar).Install LOOT[edit | edit source]
Get LOOT and install according the the instructions provided. LOOT will be launched from Wrye Bash’s interface going forward.
Install Script Extenders[edit | edit source]
Using Wrye Bash[edit | edit source]
BAIN (aka, Installers Tab)[edit | edit source]
The WB installer, "BAIN" (BAsh INstaller), is represented by the Installers Tab. BAIN is one of the most powerful interfaces of WB, as it boasts many handy features that no other mod managers offers. Once all mod packages (package is the name Wrye Bash uses for the archive file or folder containing the files from the mod) are placed within the Bash Installers directory, they will be recognized from within the BAIN interface where they can be arranged singly or in groups in any order, renamed, list markers added, conflicts detected, packages unpacked, installer wizards can be built and much more. BAIN informs the user of potential resource conflicts prior to installation and provides details concerning the conflicting resources, mods involved and the order numbers of the involved mods. This allows one to customize mod installation order to achieve the desired result. Perhaps even more importantly, BAIN keeps track of the mod-specific resource hierarchy, allowing simple installation and uninstallation of any combination of mod packages at any point in the installation hierarchy. This means that if a mod installed after a previously-installed conflicting mod is removed, then the assets from the overwritten mod will be re-installed automatically by default (this is the "Anneal" functionality of BAIN). Whats more, BAIN remembers the configuration on exit for the next WB session.
Bash (a.k.a. Mods Tab)[edit | edit source]
From within the Mods Tab, plugins can be managed using many handy tools including the infamous-yet-little-understood "Bashed Patch". The Bashed Patch takes elements from all loaded plugins (i.e., ESPs & ESMs) and merges them into a single plugin, which effectively "flattens" overlapping data conflicts and leveled lists into a single "layer," reducing and de-duplicating disparate attributes and effectively resolving otherwise incompatible data conflicts. Think of mods as a series of transparent films containing layers with opaque bits of a complex graphic. When laid atop one another, each layer adds to the final composite and masks parts of underlying transparencies. Redundancies and conflicting components are effectively merged into an overall result that is a composite mod called the Bashed Patch. This allows otherwise incompatible plugins to coexist, and many mods are completely merged into the composite, thus effectively circumventing the 255 plugin limit, since byte references to completely mergeable mods are no longer required. BOSS is still required to maintain load order, and BOSS can be launched directly from WB.
Launch Wrye Bash for the First Time[edit | edit source]

Launch Wrye Bash using the Start Menu shortcut, and WB will open to the Mods Tab, which is where plugins (ESMs & ESPs) are managed (Figure 2). Upon launch, WB creates Skyrim Mods/ beside skyrim/ by default; however, if bash.ini was customized as in the previous section, the Bash Installers folder structure is created at the custom location. This is the directory under which WB will look for mod packages (among other things); therefore, mod packages should be moved or downloaded directly to Skyrim Mods/Bash Installers/.
Click the "Installers" tab. This should invoke a pop-up warning to "enable" Installers. If it does, click on "Yes" and it should load very quickly, as there is nothing yet in the package repository. If it does not prompt, right click the header bar of the Installers and make sure "Enabled" is checked. Then select "Full Refresh". Adding a new package to BAIN is as easy as dropping a zip file into the bash installers directory. A full CRC scan of the package repository (Bash Installers/) is initiated every time the installers tab is selected, and any new mods found will be appended in alphabetical order and at the bottom of the load order in the package list. It should be noted that WB recognizes the contents of both extracted folders (called projects) and archives (called packages); however, it is strongly recommended that installers be kept in archive format as a standard practice, as this is not only a more efficient use of space, but it also prevents WB from calculating a CRC for each file in an unpacked project.Thus, projects can take a long time to scan. The archived package only counts as a single CRC.
BAIN Installers[edit | edit source]
Obtain the Mods[edit | edit source]
- Open a web browser and navigate to the STEP site on the Nexus, and download the latest STEP PDF link to the wiki guide (v2.2.1 at the time of this writing).
 NOTE:Yes, the wiki STEP Guide (SG) is right here, on THIS wiki, but we ask users to download the link from the Nexus site as a show of support for STEP on the Nexus. Feel free to endorse the project while visiting. Thanks!
 - Once on the SG wiki, carefully read through and up to STEP 2, Mod Installation.
- Study the table legend for a moment, and then follow this section up to 2.D (Fixes).
- Download each mod from 2.D and move the archives into the Bash Installers/ directory.
- Click on the WB program title bar or task bar icon to bring it into focus. This will prompt a refresh of the Installers as the newly-added packages are scanned by BAIN, so allow a few minutes for this process to complete.
- Once BAIN finishes there are a couple of different ways to organize the installers such that the STEP install order is honored; however, it is recommended that packages be renamed according to the sections to which they belong and the two digit numeric order of appearance in the STEP Guide. This simplifies the task of properly ordering packages prior to installation (a VERY important requisite).
- A few examples of renaming would be by "Section/2-digit number/optionals by letter": "J 01" | "J_01a" | "J01"
Once WB is set up correctly and the mod packages of interest are deposited into Bash Installers/, it is possible to evaluate which packages are or are not properly recognized by BAIN in order to proceed with installation. A few packages will need to be restructured in order to be properly recognized and installed by BAIN.
Package Structure & Interpretation[edit | edit source]

The installers tab contains the package-management interface. Package management is a VERY important aspect of WB, and standards of Wrye BAsh INstaller (aka BAIN package or archive) structure represent the foundation of effectively using BAIN. Unfortunately, not all mod authors pack their mods in a BAIN-ready format, so it is important to understand how to convert to the proper structure. The good news is that BAIN has some flexibility, and usually can translate archives correctly. Packages preceded by a red (simple package), white (complex package) or gray (unrecognized) box are NOT installed (installed packages will have a plus [+] symbol inside the box). Before proceeding further, all packages must be made recognizable to BAIN (i.e., gray boxes and text must be eliminated). The following examples illustrate BAIN package interpretation and allude to some effective packing methods.
- Clicking on an archive will bring up details about the package in the upper right frame (red outline), as well as any sub-packages or plugins if present just below that (blue outline), followed by a convenient area to type in some comments about the package (green outline).
- A closer look at the package details of example packages 1-4 depicted in the package list of Figure 3 reveals further detail:
- Plugin filters and sub-packages can be seen just beneath the package details viewer (see blue outline in Figure 3). Any BAIN-ready package selected that contains an ESM or ESP will list them under "Esp/m Filter". Complex BAIN packages will also list the folder names alphanumerically under "Sup-Packages". Details in Figure 6 reference the Ex 1 and Ex 5 as in Figures 4 & 5.
WARNING
This template is deprecated. Please revise markup to use Template:GallerySimple instead.7-Zip Settings: Two-core processors
7-Zip Settings: Four-core processors
WARNING
This template is deprecated. Please revise markup to use Template:GallerySimple instead.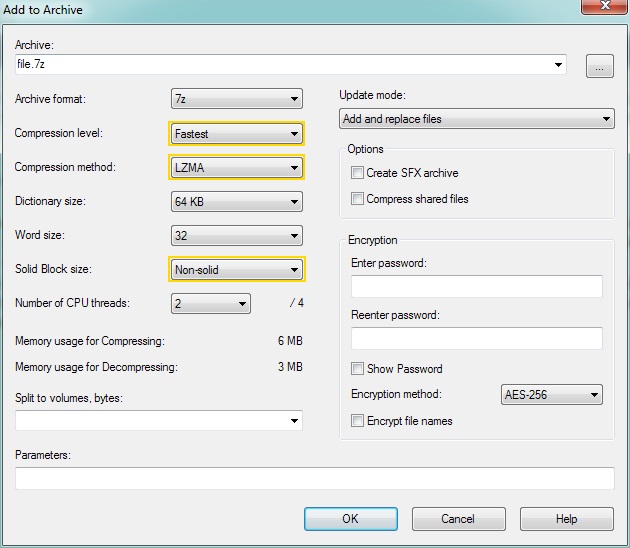
WARNING
This template is deprecated. Please revise markup to use Template:GallerySimple instead.
 Figure 4: Package Details. | ||
| Ex 1. Standard files & folders. All files and directory structure are revealed. WB recognizes several typical Skyrim file types and folder names as well as folders installed by WB itself. | Ex 2. Standard files & folders with extra, non-standard folders. There is an extra directory in this archive that is not recognized by WB, because it does not follow a standard naming convention. | Ex 2. Standard files & folders with extra, non-standard folders (revealed). The files that were invisible to WB are detected if "Has Extra Directories" is ticked in the context menu (right click any package to bring up the context menu). |
 Figure 5: More Package Details. | ||
| Ex 3. Standard files & folders (2 levels). This reveals the exact same contents ad in Ex 1 previously; however, the directory structure includes another level represented by the Data directory. Many mods are packed this way, and WB understands them just fine and will install the package accordingly. | Ex 4. Standard files & folders (3 levels). This is exactly the same as Ex 3, but the Data directory is now beneath yet another parent directory. Unfortunately, WB stops looking for anything more than 2 folders deep at this time. Many mods come packed this way, and were not created by modders that are thoughtful of BAIN. This will need to be extracted and repack according to Ex 1 or Ex 3. | Ex 5. Two folders containing standard files & folders. All preceding examples have been of simple package structure. This is an example of a complex package structure. The contents of 00 Core are exactly the the same as in Ex 4, but there the ‘01 Optional’ folder containing options (note the file names in the example). Complex package structures allow an additional level of organization. |
 Figure 6: Complex BAIN packages, Sub-Packages and Plugins. | |
| Ex 1. Standard files & folders. This is a simple BAIN archive containing a single plugin, which (unlike other files in the archive) must be selected prior to install. | Ex 5. Two folders containing standard files & folders. This is a complex BAIN archive; therefore, it contains two directories as listed in the "Sub-Packages" area, each of which contains recognized files and/or folders as listed in the package details above. As is indicated, selecting the 00 Core sub-package will direct BAIN to install those listed. Selecting also the 01 Options sub-package will add the highlighted optional files. Again, unlike other file types, plugins must be selected to flag specifically for install. |
Installing Mods[edit | edit source]
Package Order[edit | edit source]
Like all tabs in WB, the installers tab has several header elements that can be right clicked to pull up a context menu of useful commands. Left clicking on a given header label will sort the list by that column (see Figure 7).

- Once the files have been downloaded, renamed and sorted by package, BAIN should resemble Figure 8.
- NOTE:The image in these figures may not reflect STEP in its current format, as they were created using STEP v2.2.5
- The "Order" column is of particular interest, as this column defines the installation hierarchy. Packages assigned to lower numbers are installed first; thus, files from lower-numbered packages will be overwritten by those from higher numbered packages where there is conflict. Likewise, sub-packages work the same way: those with lower numeric prefixes will appear in the list first and thus, will be installed first, and conflicting files will be overwritten by those with higher numbers (sub-packages are sorted alphanumerically).
- This guide will illustrate in detail how to set up STEP mods by focusing only on the initial texture mods. The same process may be used to set up all subsequent mods.
Set the Installation Order[edit | edit source]

Because installation order is critical to get the results expected in game, the packages must be ordered properly according to install order such that the desired assets overwrite their conflicting assets. This is done by sorting BAIN installers by the "Order" field. BAIN will handle every aspect of the hierarchy according to the preset install order, regardless of what packages are installed, saving the user a huge management headache and allowing the user to easily install/uninstall alternate conflicting assets.

- Click on the "Packages" column header to sort by package name. This will organize the mods according to the STEP Guide sections (if the packages have been named according to the Guide Section codes).
- Multi-select the first (top) group of packages (Section D in this example), right click the highlighted selection, and select "Move To". Enter '0' if it is not already entered and select [OK] (see Figure 9). The package list will not change, since BAIN is set to order by package name; however, the order numbers will change.
- Select Section E packages, and repeat the previous step, but this time, enter into the "Move To" dialogue the number equal to 1 + the highest Section D "Order" number. Repeat this process for all Section groups.
- Left click on the ""Order" header to sort by package order. The new sort should cause a slight change in the package list order, but only within groups. Check to be certain that packages are now both ordered by increasing ""Order" number as well as that the package name groups are also in order (this is the STEP default, aside from a few exceptions as indicated by the order presented in the STEP Guide). If they are not, simply right click on the misbehaving package, and "Move To" a position within its respective group and in that group's Order" range.
- Once the installation order has been correctly set, the package list--when sorted on the [Order] column--should resemble Figure 10 (but for a few of the exceptions in the lower part of Section D).

Package Installation[edit | edit source]
At this point, the mod packages are ready to install. Begin by confirming that no unexpected or undesirable conflicts exist. Before doing this, it will be useful to 'hide' the packages that should not or cannot be installed. Doing so prevents these packages from being included in the conflicts viewer.
- Select all of the obsolete packages, which should now be listed at the very end of the BAIN package list after the "==Last==" marker.
- Right click on one of the selected packages and select "Hide" from the context menu (confirm when prompted; see Figure 11).


- Select one of the installers, and examine the package details in the upper right frame of the BAIN window.
- The [General] tab gives an overview of the files recognized in the package as well as some useful statistics.
- The [Matched] tab should be empty, and will only list files with paths if there is a currently-installed file in the Data directory identical to any of the files that BAIN recognizes in the selected package.
- The [Missing] tab should list all files in the package, since it is the exact reciprocal of the [Matched] tab.
- The [Conflicts] tab is of special interest, because it will reveal actual conflicts OR potential conflicts according to a setting in BAIN’s main context menu. If "Show Inactive Conflicts" is unchecked, the [Conflicts] tab should be empty, so ensure that this setting is ticked to reveal potential conflicts (Figure 12), as no packages have been installed to this point.
- Files and package "Order" numbers that will be overwritten will be listed first under the "=Lower===" heading, and those that will overwrite the currently-selected mod will be listed under the "=Higher===" heading (Figure 13). In-game, assets listed under "=Higher===" will appear in game, so verify that the conflicts will resolve as desired.
- [Underridden] and [Dirty] tabs list assets in the currently-selected installer that are not installed due to being either superseded by the assets of a mod installed upstream or due to a file mismatch for some other reason (e.g., if the file has been altered after installation), respectively. Both should always be empty.
- The [Skipped] tab lists any files/folders that are not recognized by BAIN as "install-able". For some cases, this can be rectified by ticking "Has Extra Directories" in BAIN's main context menu. If not, the file will need to be restructured within the installer if it should be installed.
- Check to be certain that any packages that have a white box preceding the package name have sub-packages selected as indicated in the middle frame on the right side of BAIN. Likewise, be certain that all necessary ESP/M Filters are also selected.
- Once all packages have been verified and all necessary or optional adjustments made to the installers, ALL packages may be selected at once and installed by right clicking one of the selected packages and clicking on "Install". This can also by done for each individual package and in any order, since the hierarchy has already been defined. Depending on computer hardware, this process could take only a minute or more than 10 minutes.
- Uninstallation is done in the same manner as installation, and all of the same rules apply.
- Once installed, the boxes preceding package names will be either yellow or green, and each will have a '+' symbol, which indicates that the package is installed. Yellow means that the package has some file installed, but others have been overwritten by higher-order packages. Green means that all files of the package are installed without any overrides (Figure 14).
- Select one of the installers, and examine the package details in the upper right frame of the BAIN window.


- Infrequently, packages that are highlighted in yellow or orange have not been installed according to the defined hierarchy. This can easily be corrected by right clicking on the package and selecting "Install Missing"". Afterwards, right click the package again and click "Anneal" or "Anneal All" to tell BAIN to consider all packages in the install list. The "Anneal" function simply tells BAIN to refresh its assessment of the defined install hierarchy and reapply those rules to correct any unintended conflicts. It never hurts to use this function frequently, and "Auto Anneal" should always be ticked in BAIN’s main context menu to honor the install hierarchy.
- Be strategic about the order in which things are installed and uninstalled, as any yellow-boxed package with a '+' symbol in it will need to be re-accessed by BAIN in order to install assets from higher-order mods that may be removed. If the overwritten package is very large (and 'solid'), it will significantly delay the uninstall of a conflicting downstream package being removed, regardless of the size of the package being removed. Even if the package being removed is being updated, then a lot of time can be saved by first positioning and installing the update, thus effectively 'blocking' the large, overwritten file from being accessed, since it will no longer be required for conflict resolution.
- Use the approach described thus far for setting up BAIN installers and installing the rest of STEP.
Package Restructure[edit | edit source]
BAIN-Repack Unrecognized Packages[edit | edit source]
- Begin by navigating to Bash Installers/ and unpacking unrecognized packages into projects of same name in same location. Do the same for any packages that need modification according to STEP recommendations.
- Within each project, find the ReadMe and READ IT if available. If it is not, then navigate to the mod’s host site on the Nexus and scan the description. If there is still ambiguity, post a comment to the mod author asking that a ReadMe be provided (this should be a mandatory requirement!).
- Determine which files/folders are necessary for installation of the mod, and restructure the projects with reference to Figures 4 & 5 under the BAIN Installers tab.
- Even though BAIN will recognize up to two directory levels, it is best-practice to structure the archive with a single directory level as if the archive itself were the Data directory.
- If there are no conflicting options within the package, then it should be packed as simple. Otherwise, pack as complex, and label the sub-package directories such that the default precedes the optional version(s).
- Once the new directory restructure of the project is complete, re-pack the mod into an archive using the same name as the project, but with ‘BAIN’ added to the end of the file name, but BEFORE the numeric package ID#. DO NOT DELETE the original package.
EXAMPLE - Simple-package repack: 1-(CORE!)Accingite Vos - HQ Shields-225-1. Rearrange the project (blue outline) into a ‘simple’ structure that BAIN will recognize (green outline). In this case, ...
- the contents of 1-(CORE!)Accingite Vos - HQ Shields-225-1/Accingite Vos/Data/ should be moved up two directories to 1-(CORE!)Accingite Vos - HQ Shields-225-1/.
- Delete the now-empty Accingite Vos & Data folders.
- Re-pack as, for example, 1-(CORE!)Accingite Vos - HQ Shields_BAIN-225-1.7z.
- Once finished, move the new BAIN archive back up to Bash Installers/ and delete the source project (but DO NOT DELETE the original unrecognized source package).

EXAMPLE - Complex-package repack: 3-(CORE!-FPS!)Skyrim Realistic Overhaul_1024-5400-1 This mod represents a good opportunity to produce a proper BAIN complex package using 3 separate input packages (low-res option, hi-res option, update). The desired result can be achieved in several ways, and the following is arguably the simplest. Starting with:

- Begin by renaming the top sub-folder of the low-res project from “Skyrim Update Overhaul 1024" to simply "1024 res", and rename the top sub-folder of the hi-res project from "Skyrim Update Overhaul" to "2048 res".

- Copy "2048 res" from the hi-res project into the low-res project along side "1024 res", and delete the hi-res project.

- Copy the "1024 res" and "2048 res" folders from the update into what used to be the low-res project and overwrite all when prompted.

- Apply TheCompiler’s advice, by creating two new directories called "1024 res (not recommended)" & "2048 res (not recommended)"

- Copy the textures folder from "1024 res" to "1024 res (not recommended)", and copy the textures folder from "2048 res" to "2048 res (not recommended)". Delete the update project.
- Finally, remove the textures/landscape/roads/ files indicated by TheCompiler from "1024 res" & "2048 res" and remove EVERYTHING BUT these files from “1024 res (not recommended)" & "2048 res (not recommended)" (i.e., the inverse).
- Optionally, add numeric prefixes to the sub-project names in compliance with standards for complex BAIN packages. This delineates conflicts.
- Optionally, it is recommended that any ReadMe files present be named accordingly and placed into a folder named "Docs" created beside each of the "Textures" folders within each sub-project.

- The result is a complex BAIN package for SRO that includes all options for maximum customization. Archive the project into an aptly-named package and move to Bash Installers/.
- Delete the remaining project, but DO NOT DELETE the original three SRO packages!
Repeat this process for all remaining projects that need BAIN re-packing, TheCompiler’s advice modifications or whatever makes sense beyond that. This process is tedious, but it forces the mod user to become intimately familiar with a given mod, which will be useful later on.
Working With BCFs[edit | edit source]
BAIN "Package" Conversion Files[edit | edit source]
BCFs (BAIN Conversion Files) are very useful compressed instruction scripts that tell BAIN how to create BAIN-ready installers from BAIN-incompatible packages. Given that both source file(s) and converted BAIN version(s) exist, it is quite simple to create a BCF to make the task fast and easy for other downstream users.

Creating a BCF[edit | edit source]
- First, create the BAIN package manually from the unpacked source package(s). Refer to the second example in the previous section on "Package Restructure" using SRO.
- Place BOTH source package(s) and final BAIN-restructured package within Bash Installers/.
- In BAIN, select the package(s) that were used as the source(s) of the resulting BAIN file, and right click to bring up the context menu (see Figure 9). Select "Conversions" > "Create".
- Select the BAIN package created in #1 when prompted (e.g., the SRO example described previously).
- Select “OK” to the following pop-ups.
- The results will be summarized, and the new BCF will be created in Bash Installers/Converters/.
Once a BCF is created, there is less value to retaining the original non-BAIN source packages. It is recommended that these be separated from the actual installers by selecting each source package, right click, select "Move To", and enter in a -1. This will move them to the bottom of the installation list when packages are later sorted by "Order". … More on this later in the guide ...
WARNING
This template is deprecated. Please revise markup to use Template:GallerySimple instead.Figure 10: Create BCF dialogue (Pt 1).
Figure 11: Create BCF dialogue (Pt 2).
WARNING
This template is deprecated. Please revise markup to use Template:GallerySimple instead.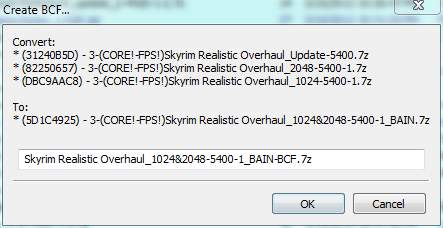
WARNING
This template is deprecated. Please revise markup to use Template:GallerySimple instead.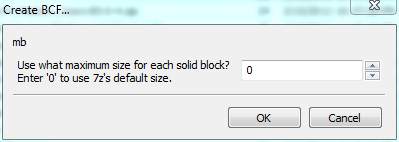
Applying a BCF[edit | edit source]
- Drop the mod into Bash Installers/ and the BCF.7z into Bash Installers/Bain Converters/
- Start WB and go to the Installers Tab (BAIN)
- Right-click on the mod (most likely at bottom of list)
- Select "Conversions" > "Apply" > BCF.7z
- Give the output BAIN package a name (accept the default)
- Right-click the new package (most likely at bottom of list)
- Select "Wizard", and follow the instructions
Mod Management[edit | edit source]
Using the WB Mods Tab[edit | edit source]
Setting the load order of the plugins[edit | edit source]
Now that the installation is finished and verifiable, move to the Mods tab to begin ordering your plugins according to the latest BOSS masterlist (or preferably use LOOT). No need to tick the plugins via the 'Data Files' menu via the Skyrim Launcher. WB will take care of that right here, simply tick every box, then click on the BOSS icon at the bottom left of the WB window. This will execute boss and potentially give you some recommendations or warnings and perhaps suggestions for 'Bash Tags' or that a mod can be marked as mergeable. For now, I will stop right here, as the complexities of plugin management are not relevant at this stage of STEP. The same is true for INI Edits and Saves tabs.
INI Tweaks[edit | edit source]
Nothing interesting here right now ...
Official Documentation[edit | edit source]
The following documents are updates to the original WB documentation and will be updated with each official WB release moving forward. These guides will also support Skyrim users.
Currently maintained by Utumno and hosted on the GitHub documentation site. Current and future releases of WB will include this documentation.
The Mopy/Docs/ folder in the Wrye Bash distribution for Skyrim includes General Readme, Advanced Readme, Technical Readme, Version History. These are also available through the help command in Wrye Bash.
In addition to these, as pointed out on the Nexus documentation page for Wrye Bash, a useful unofficial guide is alt3rn1ty's Wrye Bash Pictorial Guide for Oblivion.