
SkyrimLE:Dynamic Distant Objects LOD: Difference between revisions
TechAngel85 (talk | contribs) m (Text replace - "{{Notice|text=" to "{{alert|type=notice|text=") |
TechAngel85 (talk | contribs) m (Text replace - "{{Warning Small|text=" to "{{alert small|type=warning|text=") |
||
| Line 186: | Line 186: | ||
#Click {{ui|OK}} on the information window to get to the ''DynDOLOD Worlds'' window. One the ''DynDOLOD Words'' window, select {{ui|Advanced>>>}} | #Click {{ui|OK}} on the information window to get to the ''DynDOLOD Worlds'' window. One the ''DynDOLOD Words'' window, select {{ui|Advanced>>>}} | ||
#In the Advanced setting window, tick the ''Candles'' options. Then in the ''Select Worlds'' box, right click and choose {{ui|Select all}}. Finally, click the {{ui|Medium}} button. | #In the Advanced setting window, tick the ''Candles'' options. Then in the ''Select Worlds'' box, right click and choose {{ui|Select all}}. Finally, click the {{ui|Medium}} button. | ||
#The ''Mesh Rules'' box will populate. Click {{ui|OK}} to run DynDOLOD. Sit back and relax for a bit as the script will take between 10 to 25 minutes, on average, to run.<br/>{{ | #The ''Mesh Rules'' box will populate. Click {{ui|OK}} to run DynDOLOD. Sit back and relax for a bit as the script will take between 10 to 25 minutes, on average, to run.<br/>{{alert small|type=warning|text=Do '''NOT''' close any windows during this process! Let it run. It is recommended to not use the computer while DynDOLOD is running since it is very intensive and will stress your CPU.}}{{alert small|type=notice|text=When completed the output for STEP:Core and STEP:Extended will be ~1GB.}} | ||
#Once the script is done, click {{ui|Save & Exit}} and then click {{ui|OK}} to save the new plugin. (If there were errors, seek help on the forums. A link is provided at the top of the page.) | #Once the script is done, click {{ui|Save & Exit}} and then click {{ui|OK}} to save the new plugin. (If there were errors, seek help on the forums. A link is provided at the top of the page.) | ||
#Find the ''STEP DynDOLOD Output'' mod created in step 7 of the ''DynDOLOD Output Files'' installation above. Right-click it and select {{ui|Open in explore}}. | #Find the ''STEP DynDOLOD Output'' mod created in step 7 of the ''DynDOLOD Output Files'' installation above. Right-click it and select {{ui|Open in explore}}. | ||
Revision as of 04:55, October 30, 2020
Dynamic Distant Objects LOD
by ShesonCR Patch:
{{{core}}}"{{{core}}}" is not recognized as a Boolean (true/false) value.
LW Patch:
{{{landw}}}"{{{landw}}}" is not recognized as a Boolean (true/false) value.
PP Patch:
{{{pp}}}"{{{pp}}}" is not recognized as a Boolean (true/false) value.
ENB Option:
{{{enb}}}"{{{enb}}}" is not recognized as a Boolean (true/false) value.
WARNING
This template is deprecated. Please revise markup to use Template:GallerySimple instead.WARNING
This template is deprecated. Please revise markup to use Template:GallerySimple instead.
WARNING
This template is deprecated. Please revise markup to use Template:GallerySimple instead.
WARNING
This template is deprecated. Please revise markup to use Template:GallerySimple instead.
WARNING
This template is deprecated. Please revise markup to use Template:GallerySimple instead.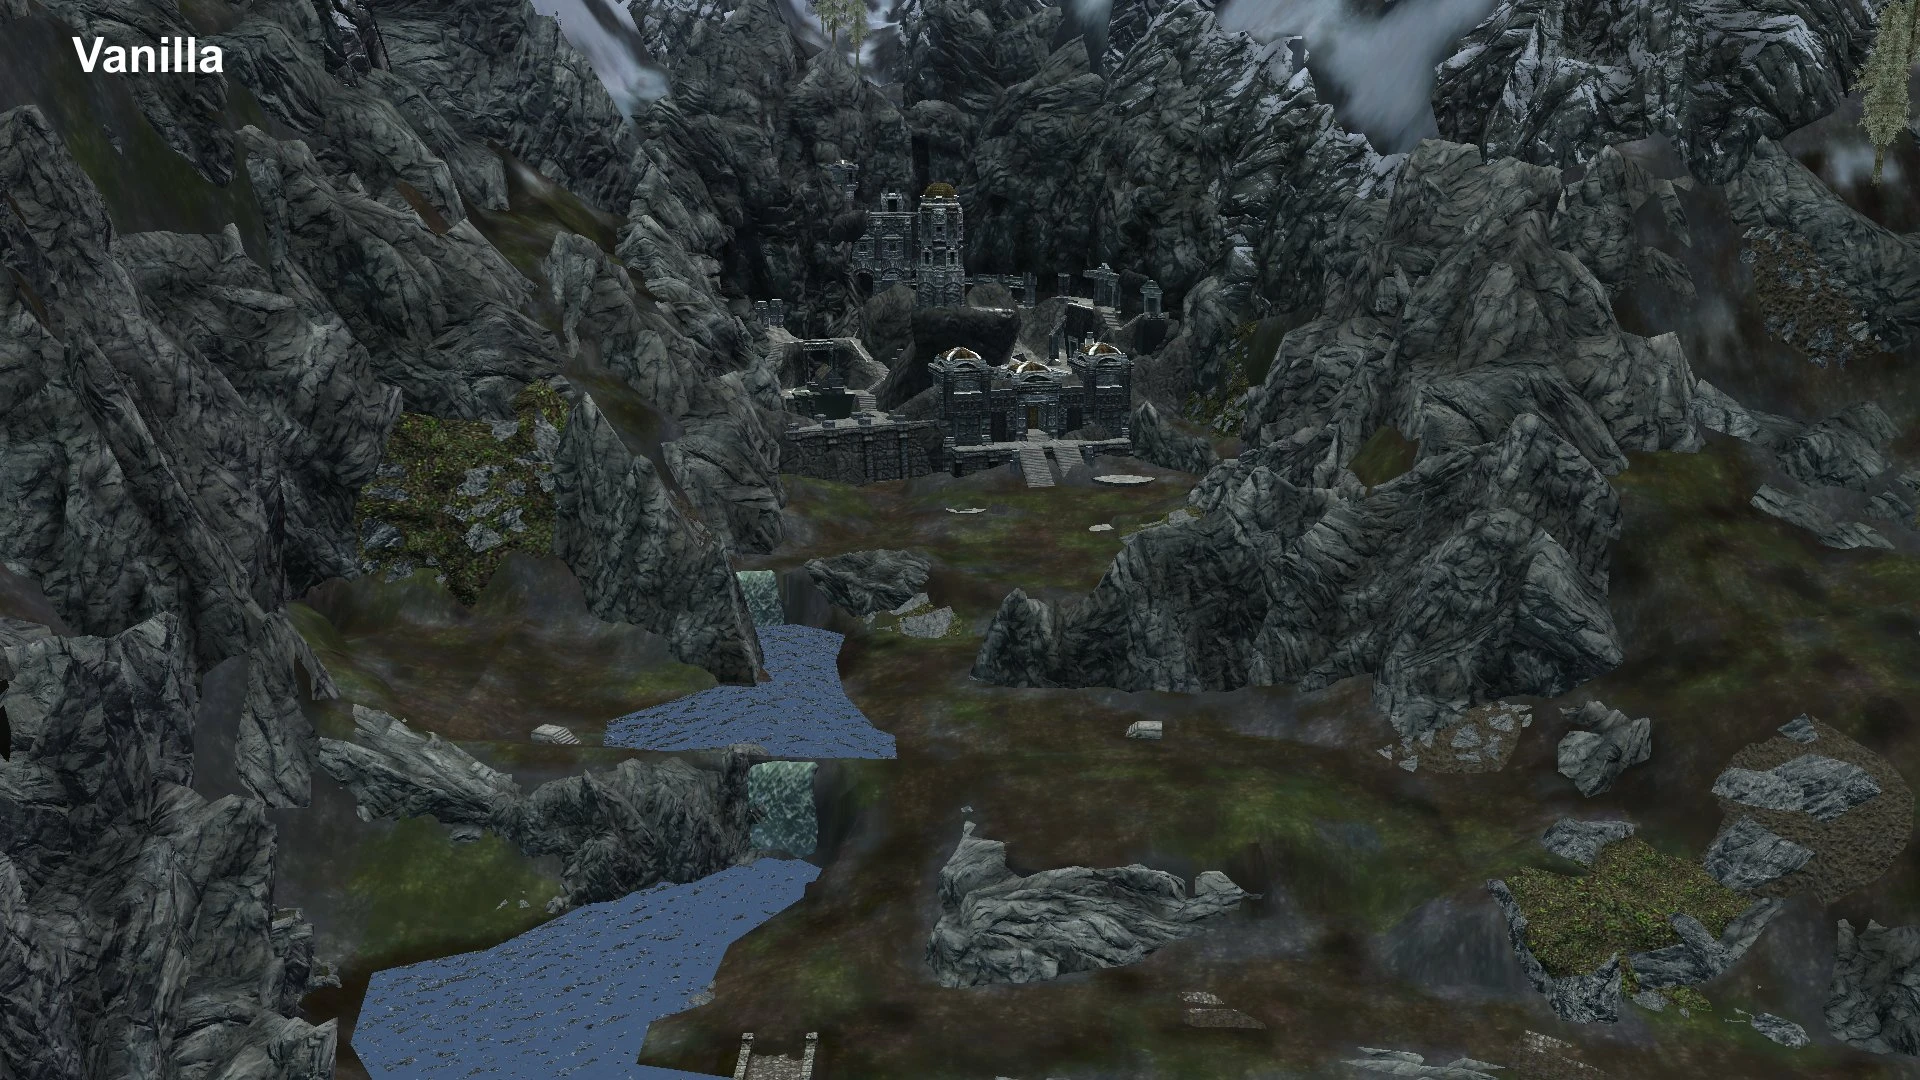
WARNING
This template is deprecated. Please revise markup to use Template:GallerySimple instead.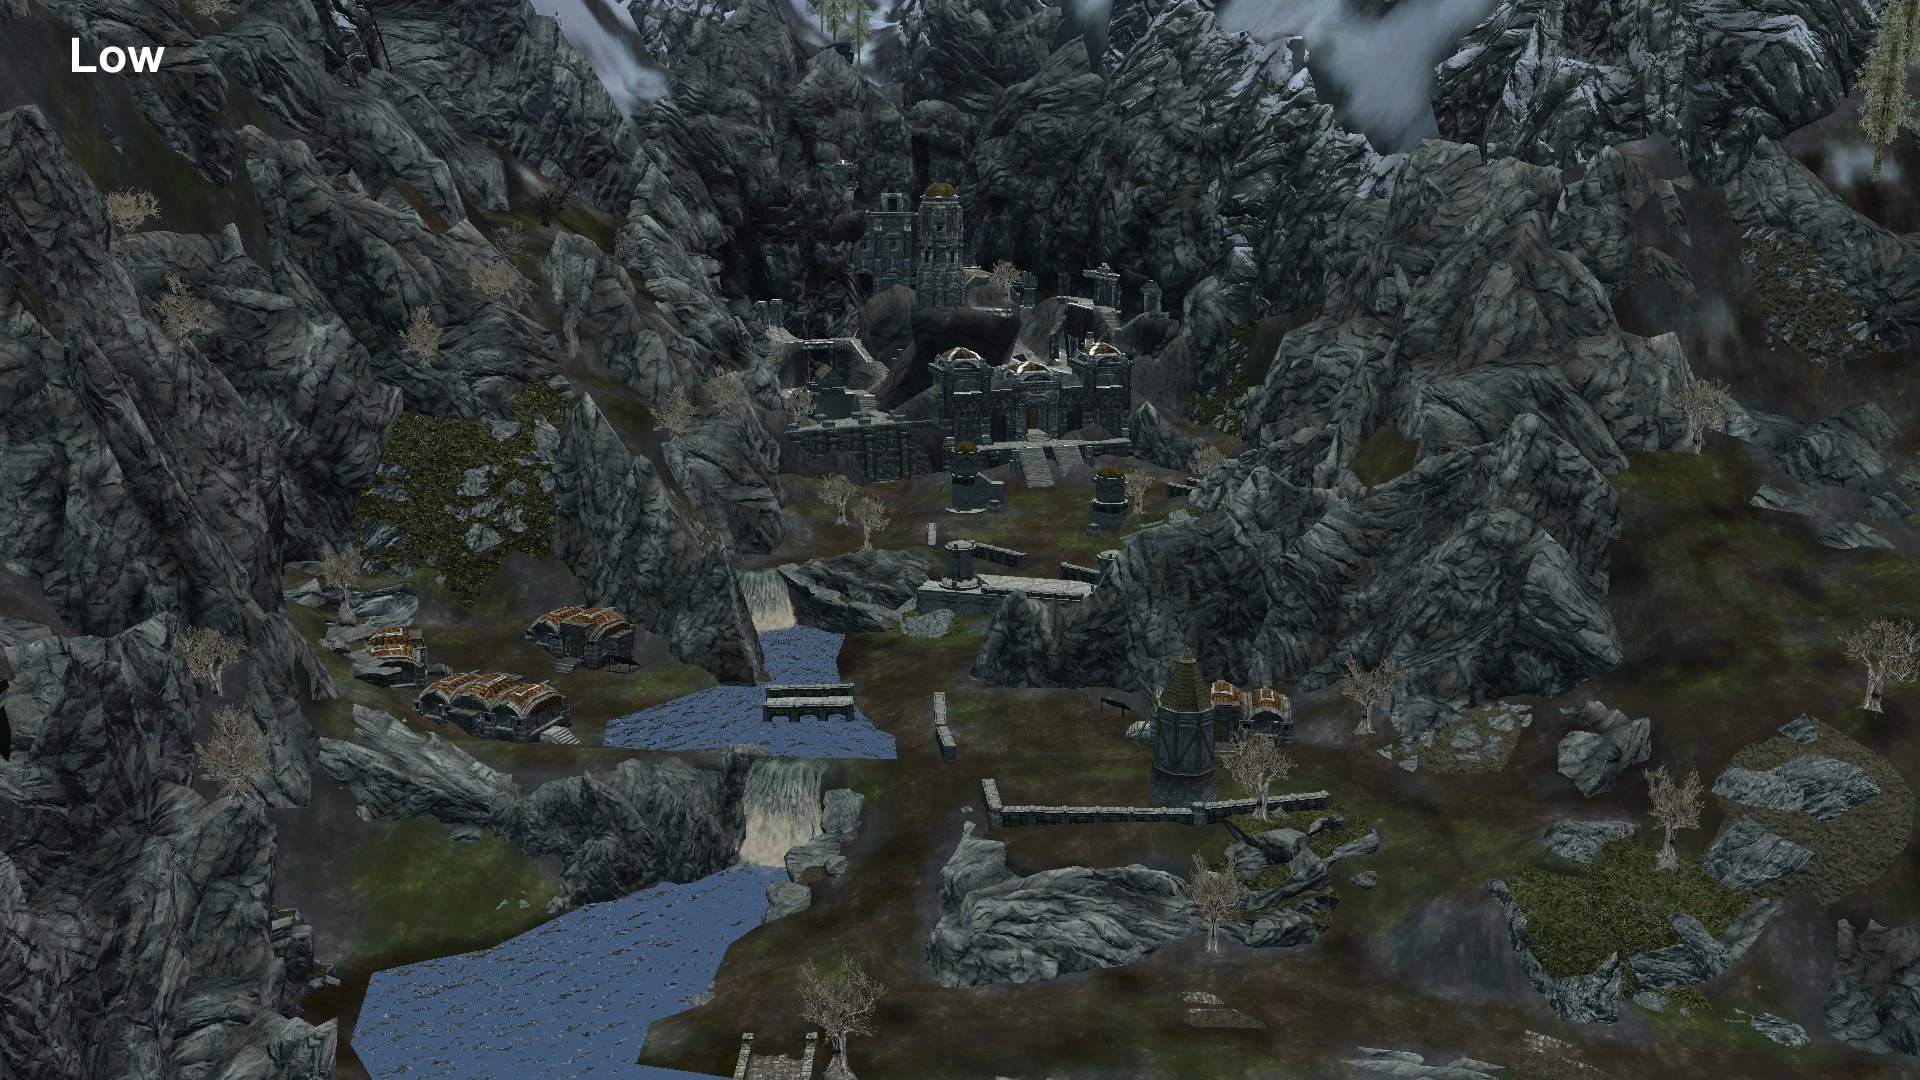
WARNING
This template is deprecated. Please revise markup to use Template:GallerySimple instead.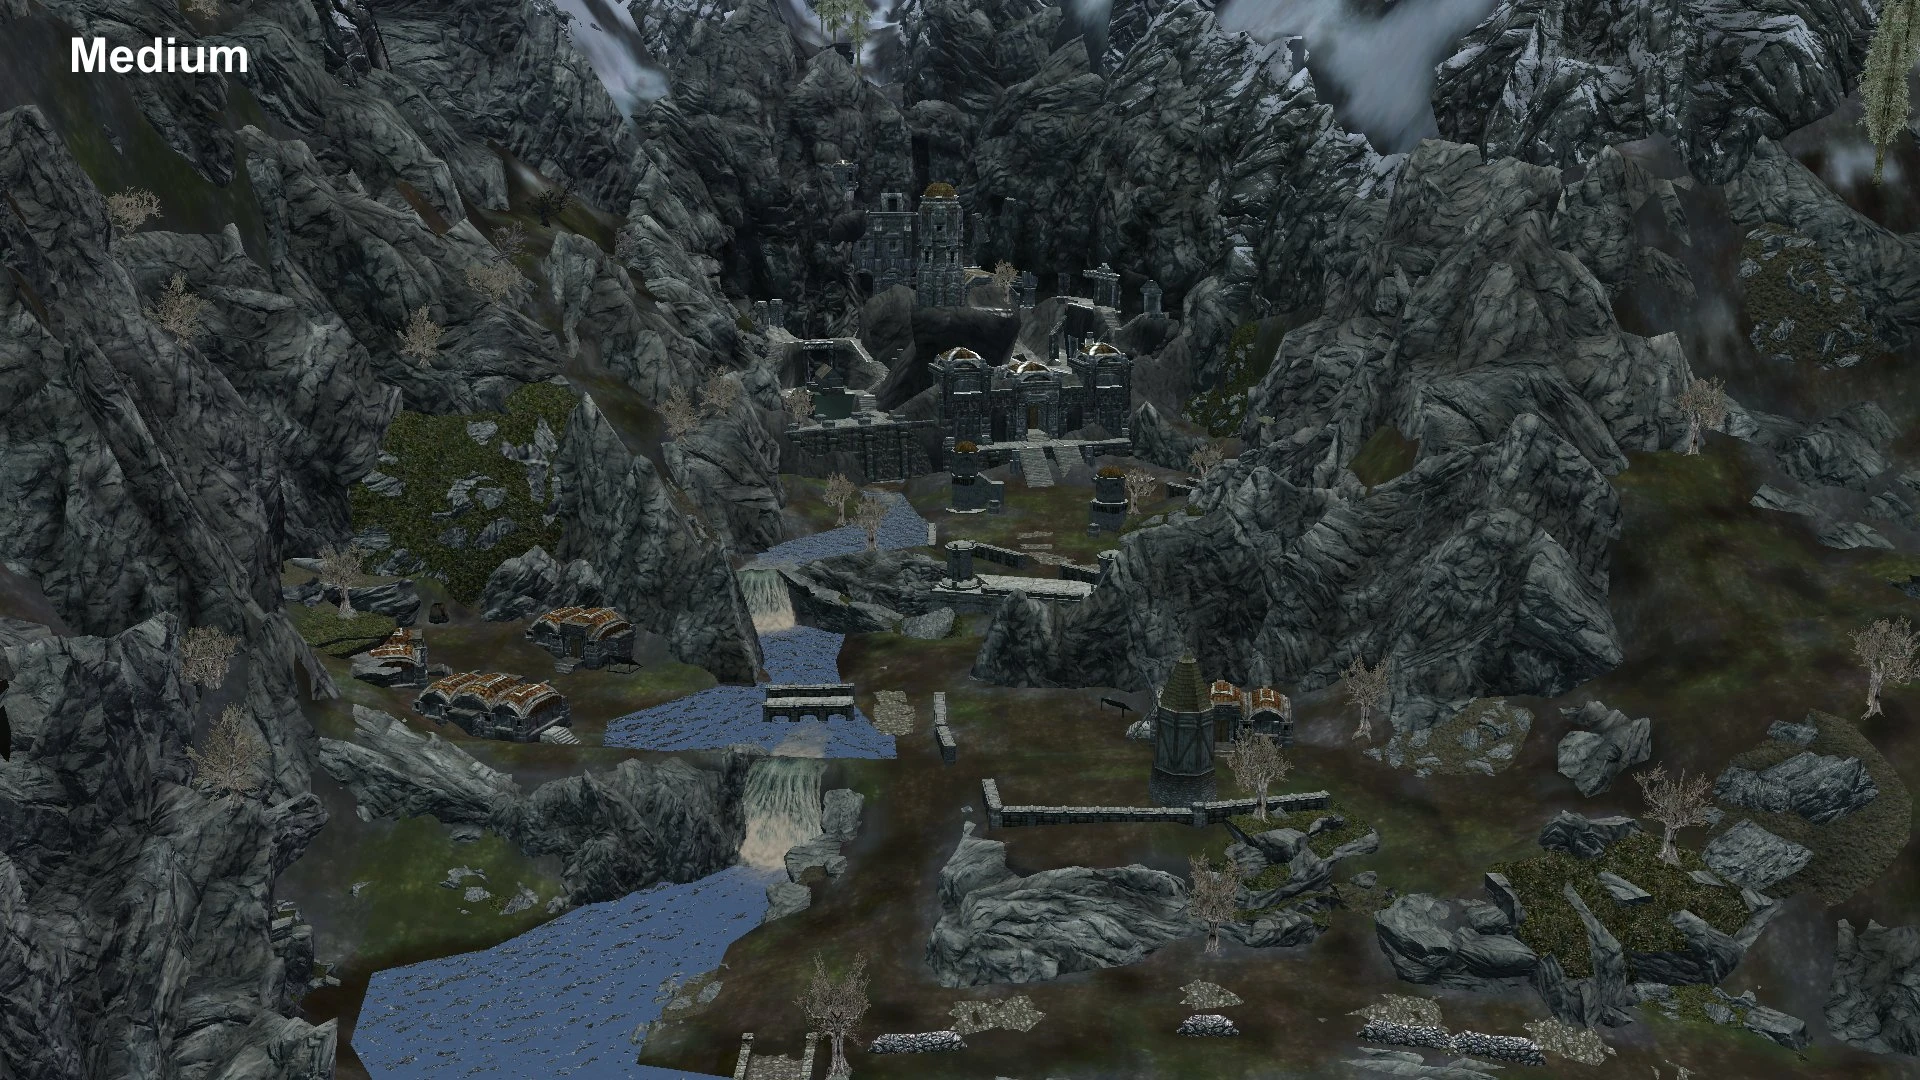
WARNING
This template is deprecated. Please revise markup to use Template:GallerySimple instead.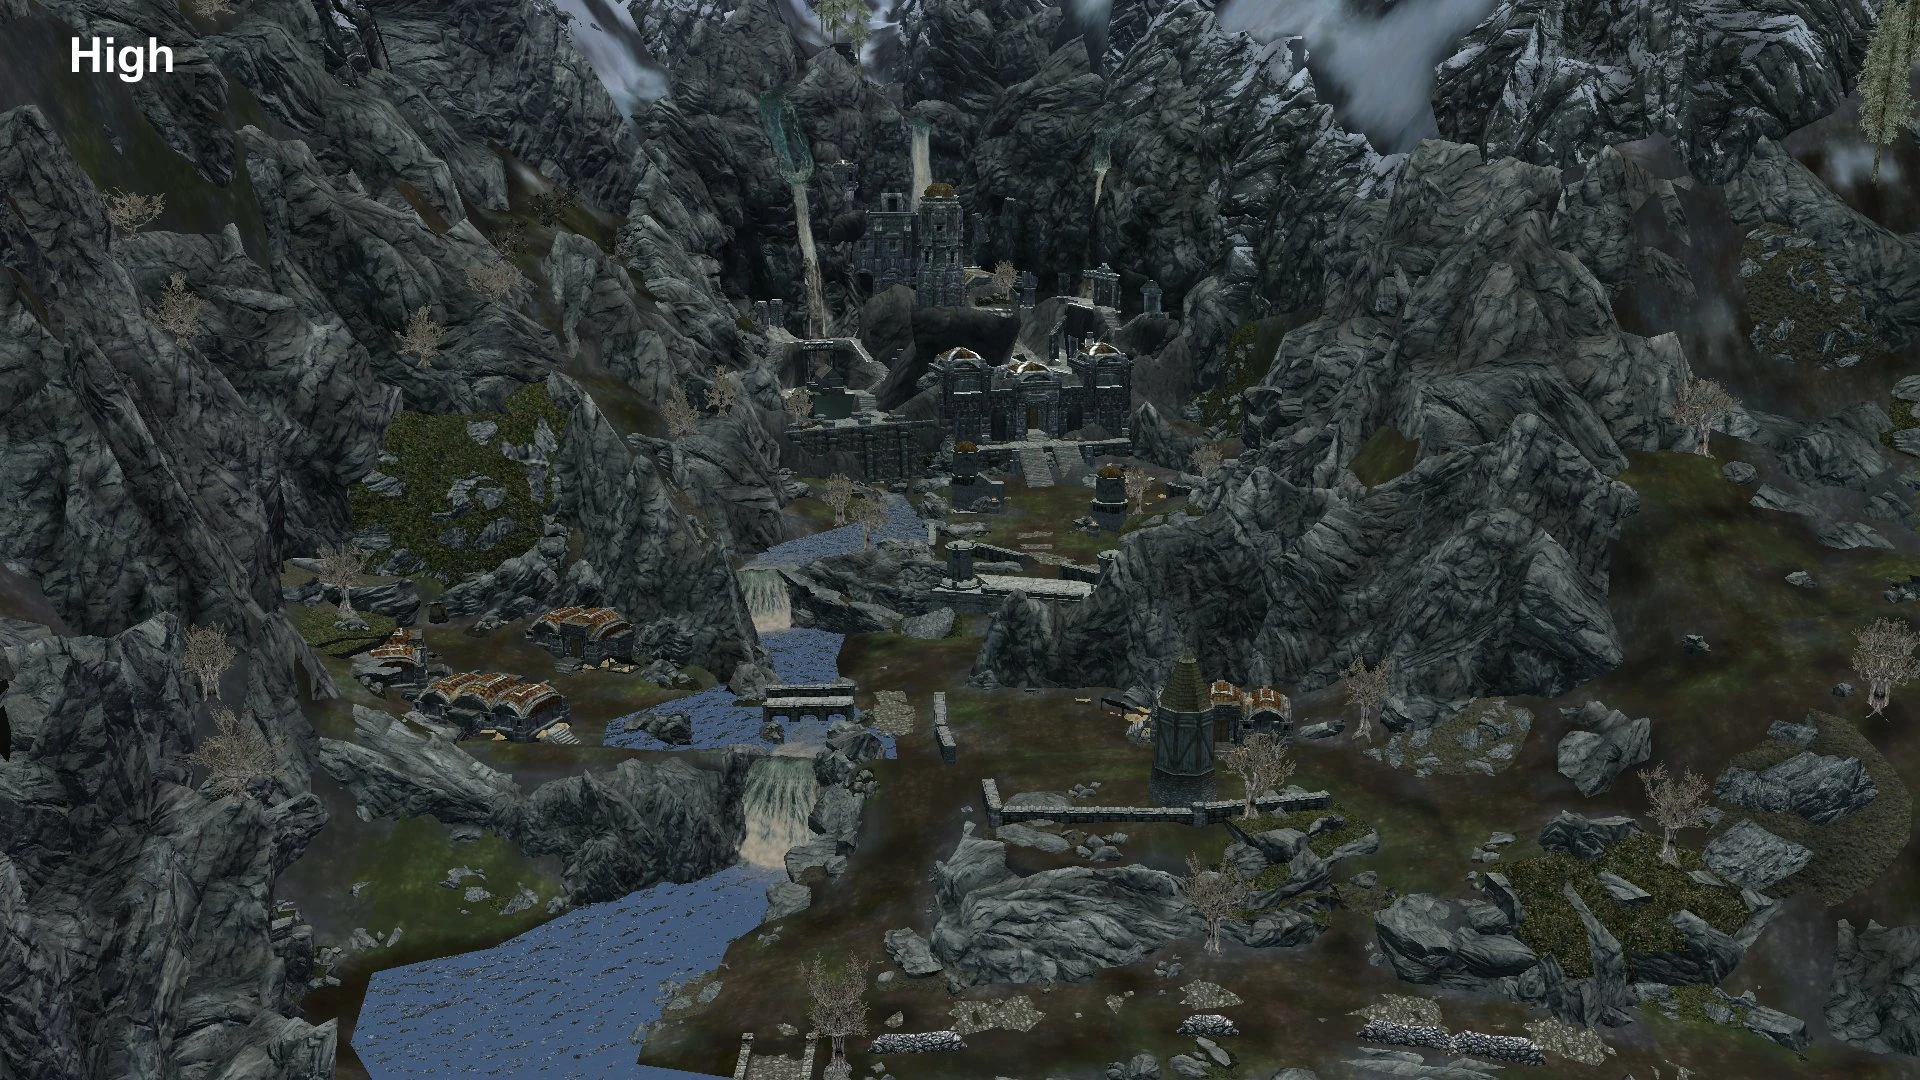
WARNING
This template is deprecated. Please revise markup to use Template:GallerySimple instead.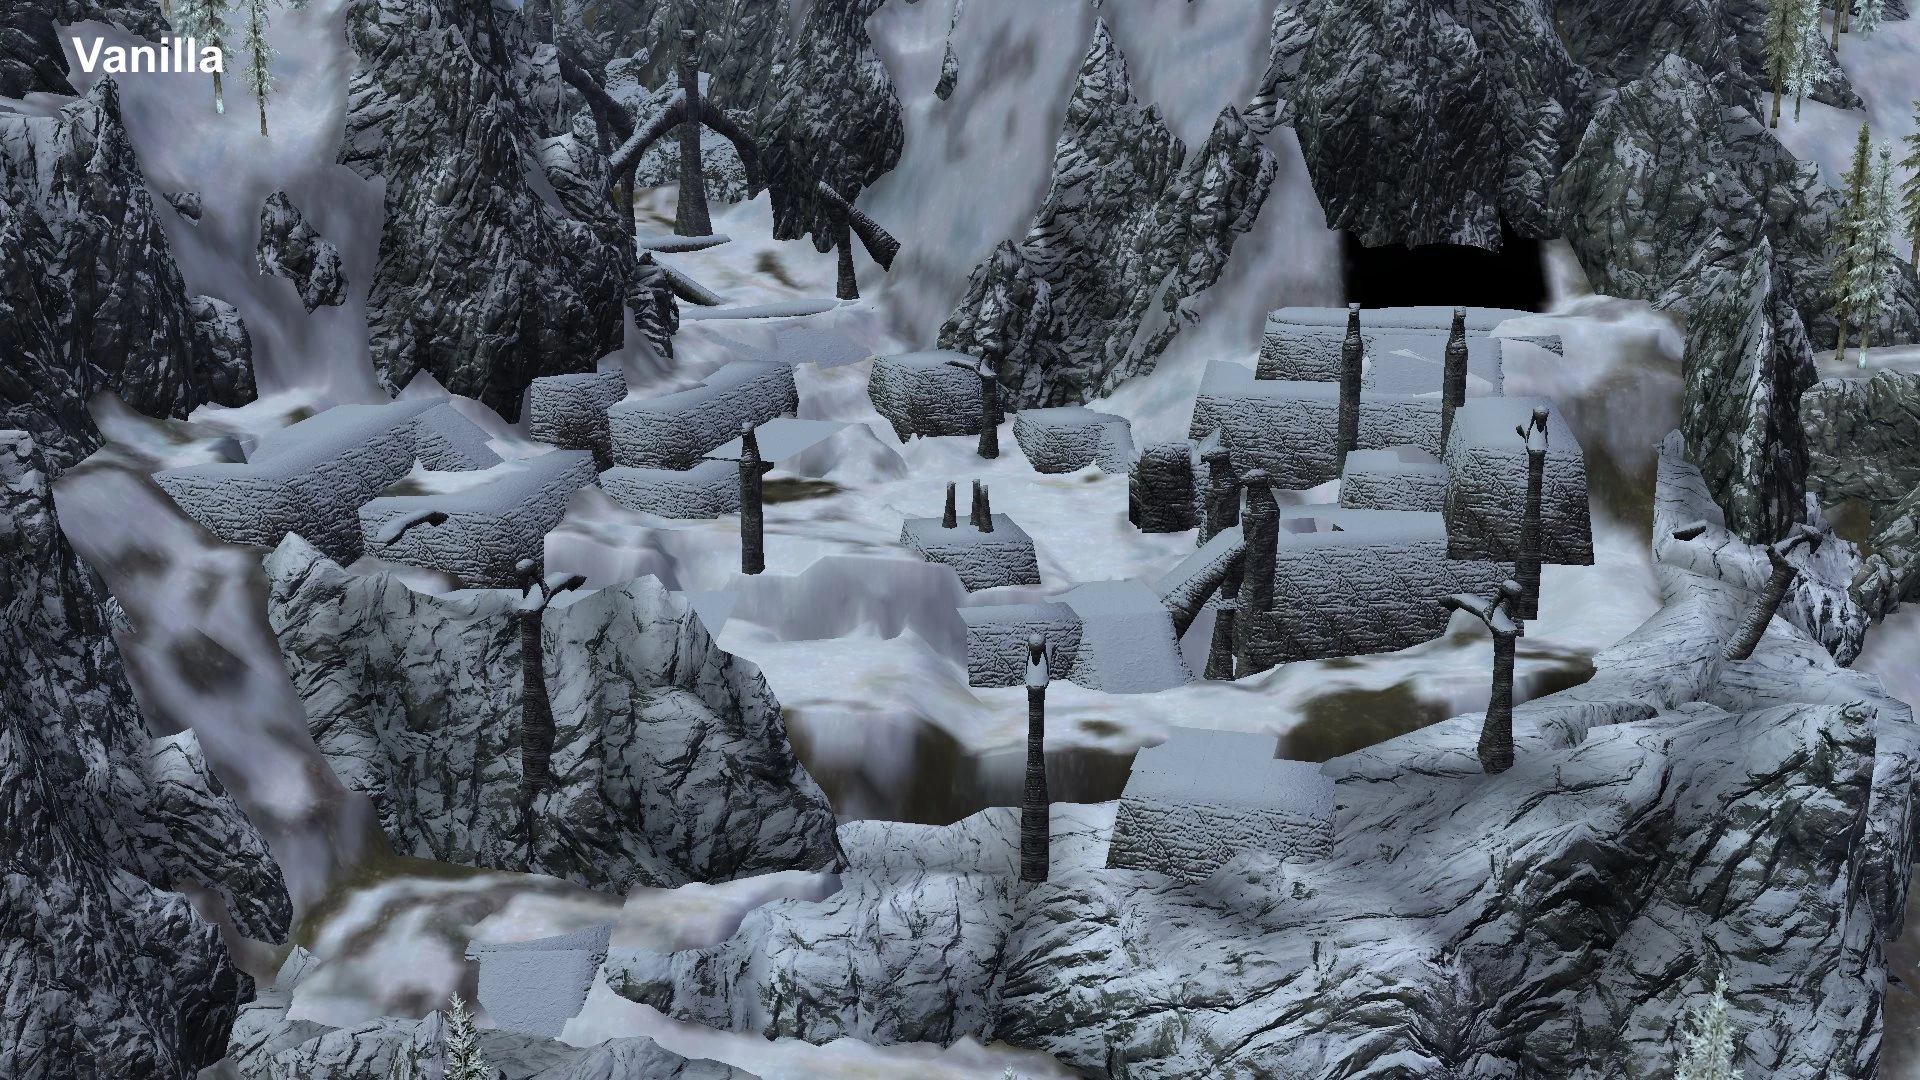
WARNING
This template is deprecated. Please revise markup to use Template:GallerySimple instead.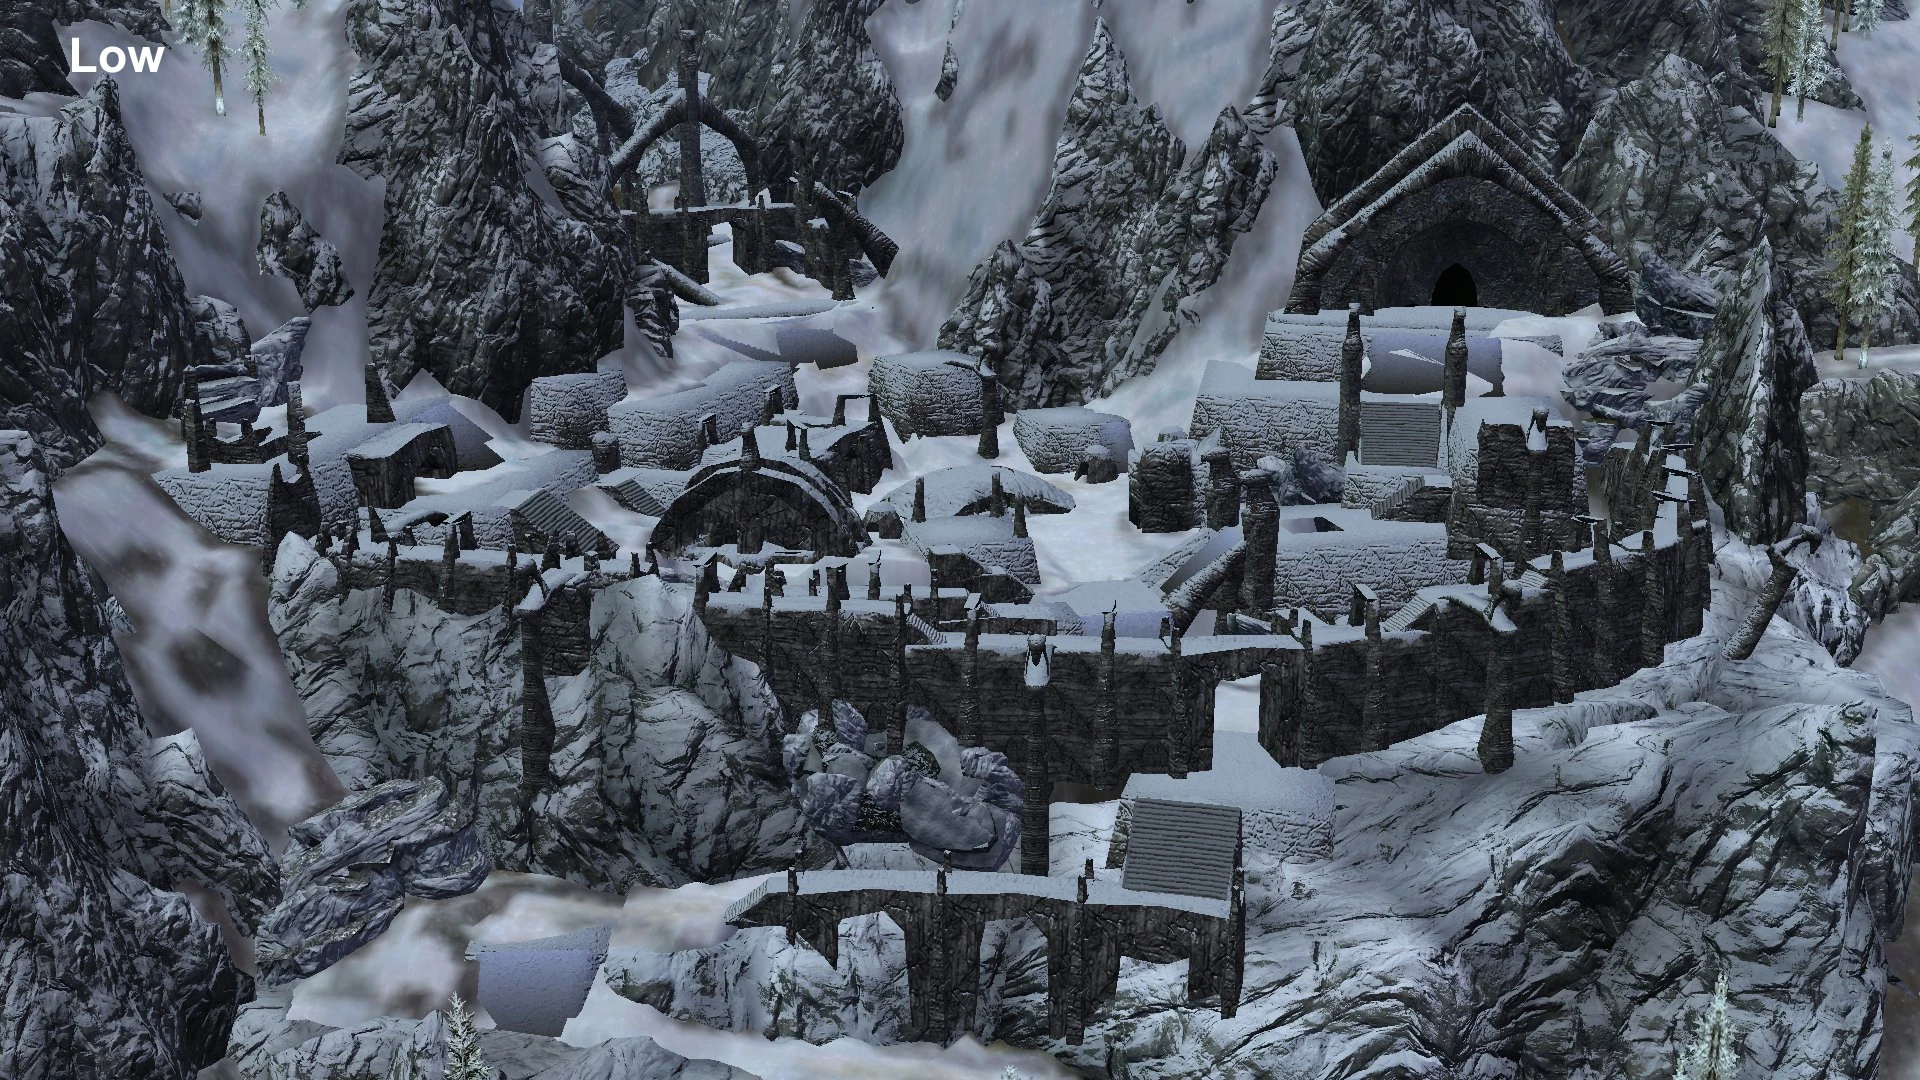
WARNING
This template is deprecated. Please revise markup to use Template:GallerySimple instead.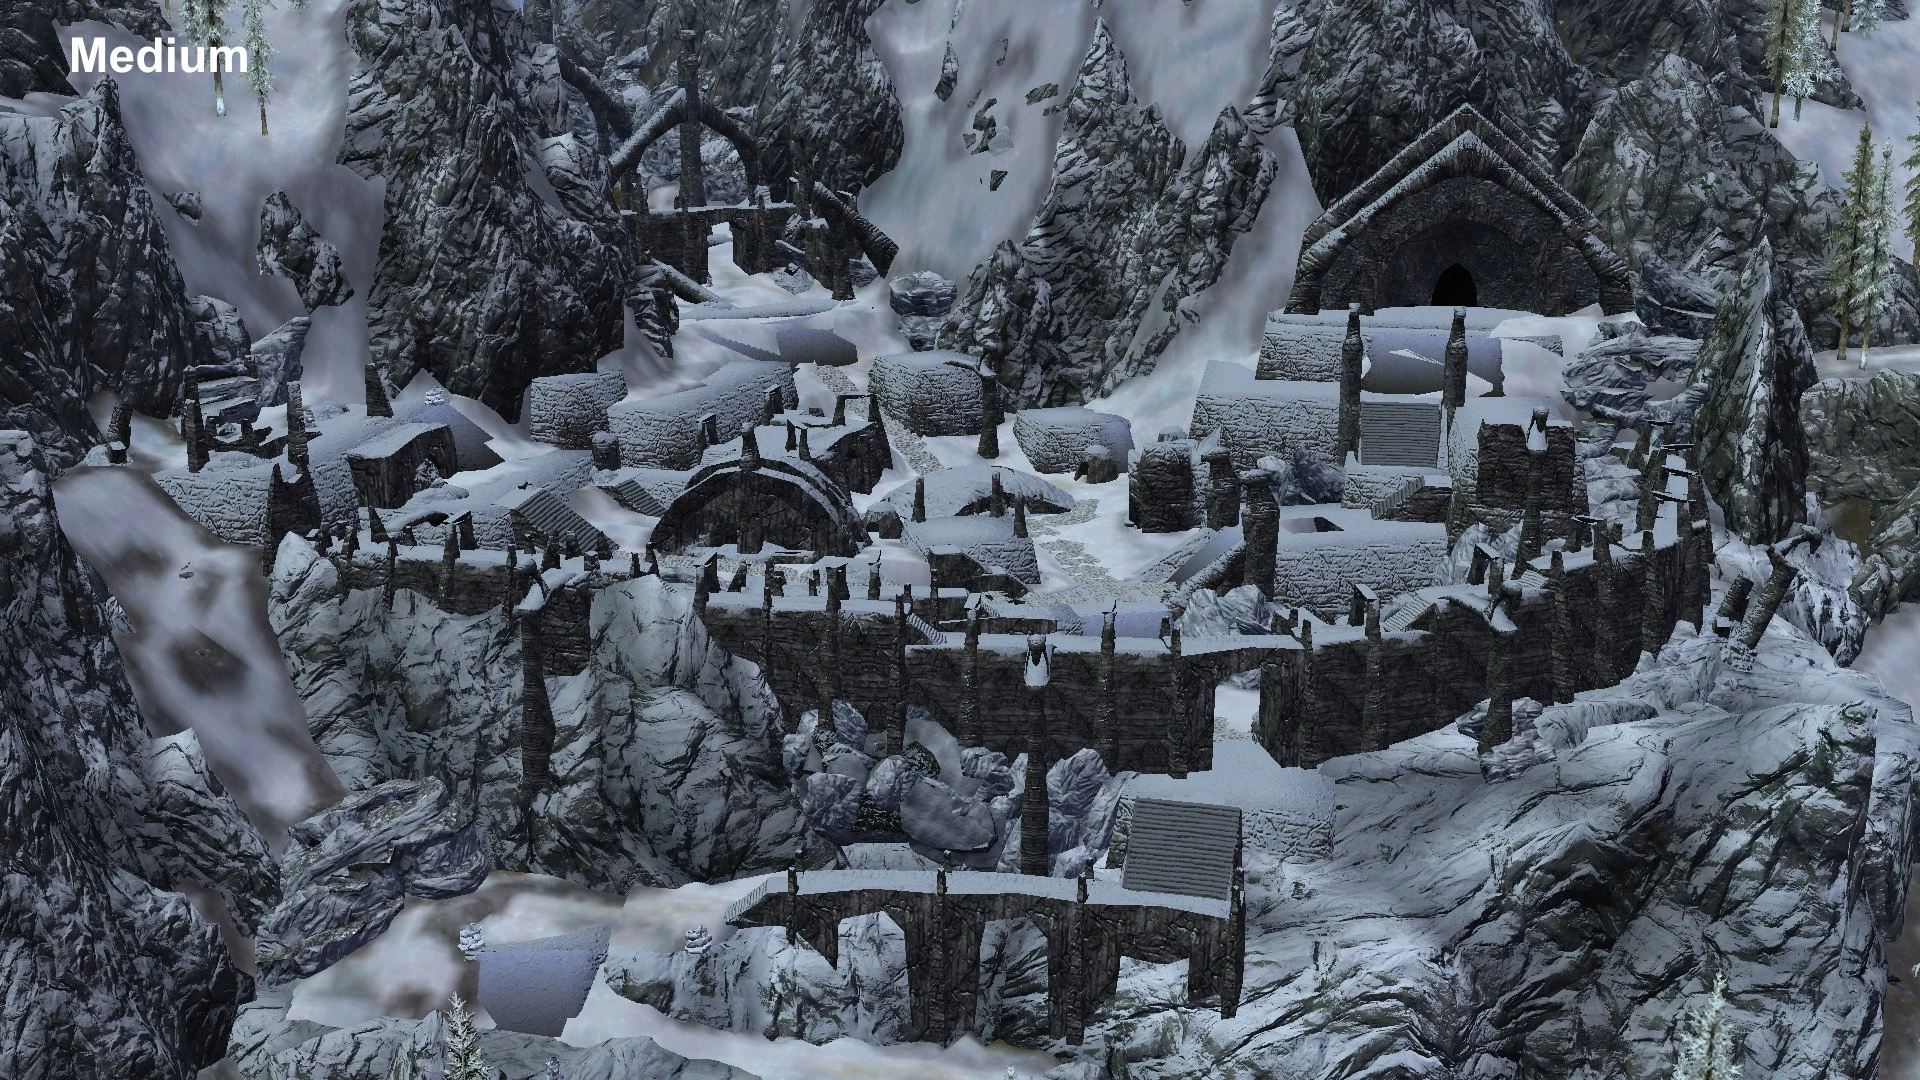
WARNING
This template is deprecated. Please revise markup to use Template:GallerySimple instead.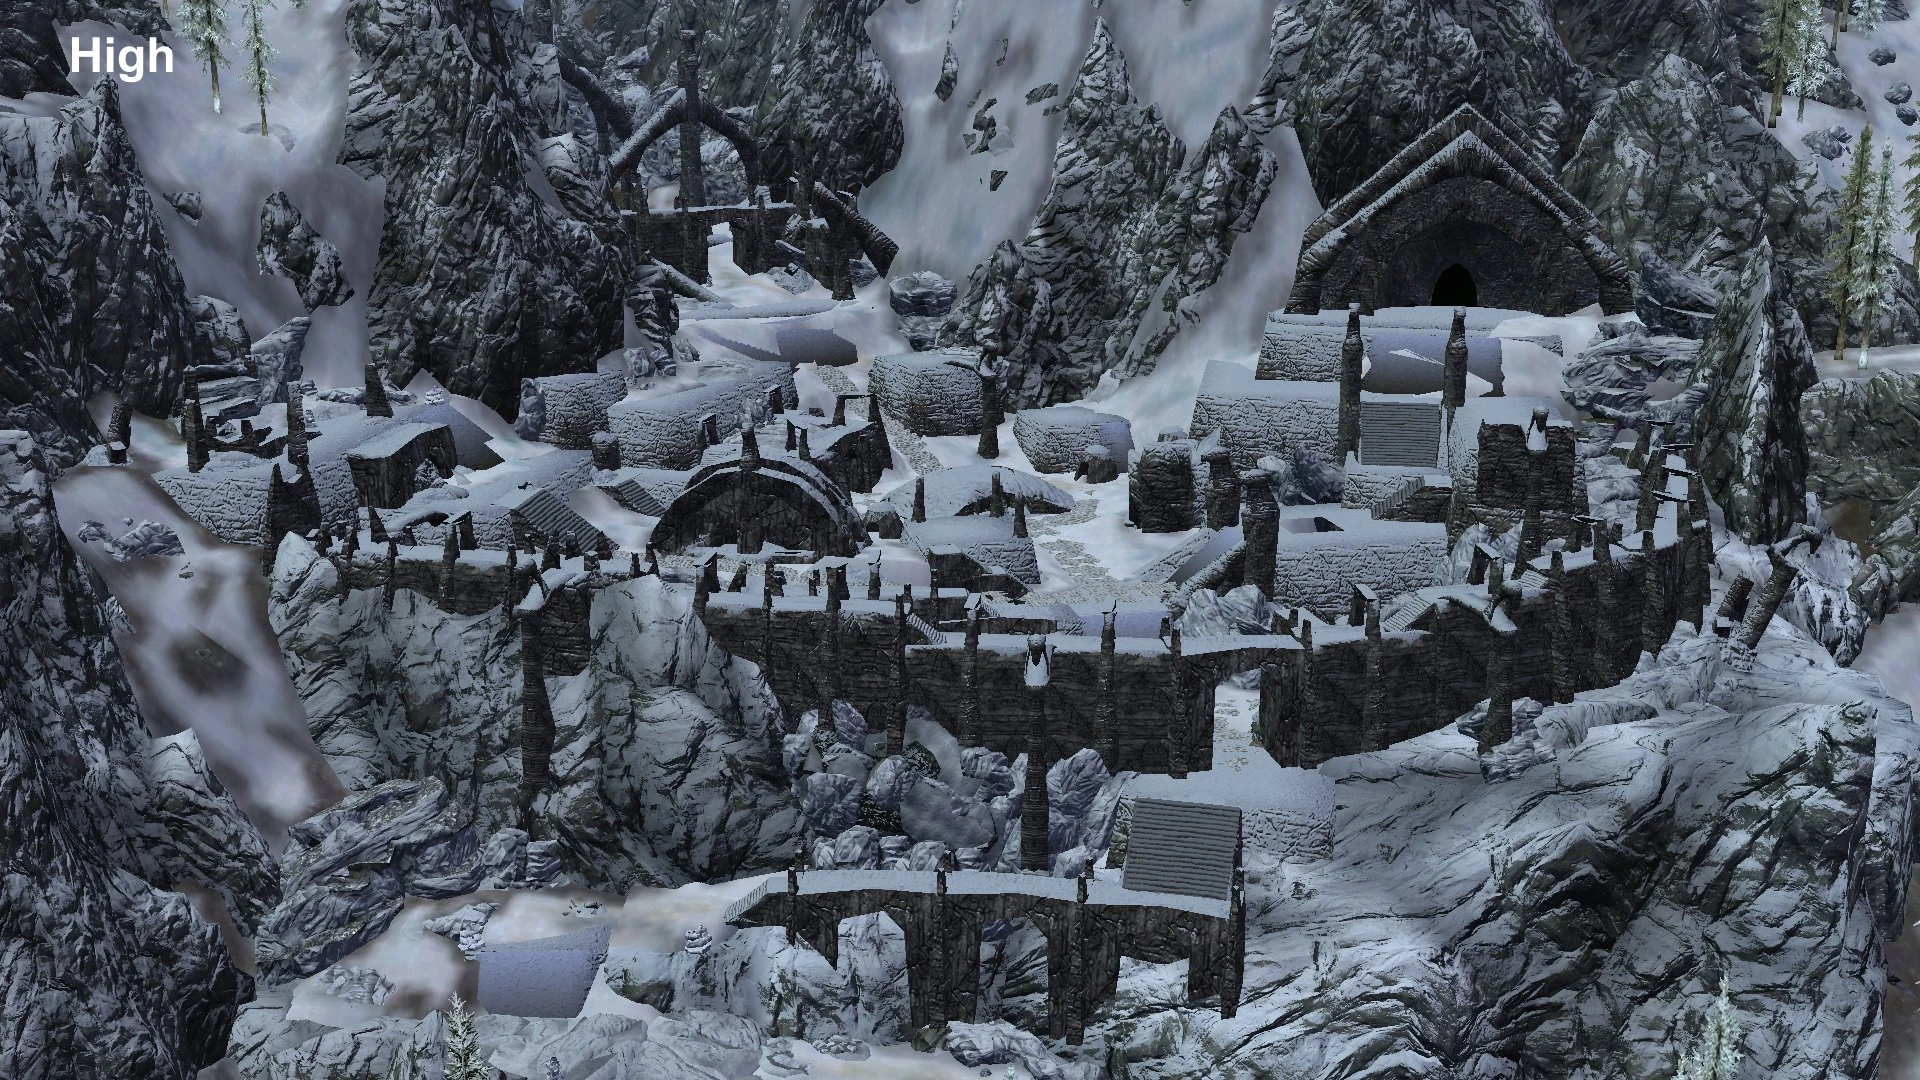
WARNING
This template is deprecated. Please revise markup to use Template:GallerySimple instead.
WARNING
This template is deprecated. Please revise markup to use Template:GallerySimple instead.
WARNING
This template is deprecated. Please revise markup to use Template:GallerySimple instead.
WARNING
This template is deprecated. Please revise markup to use Template:GallerySimple instead.
Guide/Version-Specific Mod Recommendations
| Existing Guides |
|---|
| 2.10.0 |
| 2.2.9.1 |
| 2.2.9.2 |
| 3.0.0 |
Recommendations
Requirements
- Latest version of DynDOLOD and DynDOLOD Resources.
- Latest version of PapyrusUtil-Modders Scripting Utility Functions
- STEP Compilation - This provides the tree billboards to use with STEP. If using different trees than SFO Basic Edition v1.87, then you will need to install those billboards after the STEP Compilation.
- Be sure the following line is in your Skyrim.ini or DynDOLOD will not fully process:
[Archive] sResourceArchiveList=Skyrim - Misc.bsa, Skyrim - Shaders.bsa, Skyrim - Textures.bsa, Skyrim - Interface.bsa, Skyrim - Animations.bsa, Skyrim - Meshes.bsa, Skyrim - Sounds.bsa

- 2 - PapyrusUtil

- 3 - STEP Compilation

- 4 - Skyrim INI
WARNING
Returning users who are updating from DynDOLOD v1.x to version 2.x will need to turn off MO's archive management in the Archives tab by unticking the "Have MO manage archives" box, and ensure all the archives are checked in the list below. Lastly, on the Plugins tab, ensure the dummy plugins are re-enabled by ticking them. This is necessary for DynDOLOD v2.x to run correctly.
WARNING
DynDOLOD 2.xx requires an installation from scratch. All former files - meshes, textures, scripts etc. plus all generated LOD should be removed first. Existing files installed to xEdit\Edit Scripts\* do not matter anymore and should not have any effect on the new DynDOLOD standalone if you install it into a new folder. Since LOD generated with older versions will not work with the papyrus scripts from DynDOLOD 2.xx, remove older versions of the patcher from the xEdit folder.
If an existing save is updated, follow the “clean save” cycle: first deactivate DynDOLOD from MCM, wait for deactivation message, go into interior, check MCM DynDOLOD is still deactivated, save, exit game. Remove old DynDOLOD.esp, remove old scripts and remove old meshes/skse/textures. Start game, load last save, wait a bit, save again. Install the new papyrus scripts, the new DynDOLOD.esp and the new generated LOD. Enable the new DynDOLOD.esp. Start game, load the last save, go outside. DynDOLOD should initialize by itself, else activate from MCM.
Before running DynDOLOD.exe, please make sure the CPU is properly cooled and in case it is overclocked, it is verified to be stable. Some routines make use of all cores at times and several LODGen.exe processes are started in parallel when generating for multiple worlds at once.
Installation
DynDOLOD Executables
- Download DynDOLOD from Nexus.
- Extract the archive to a location of your choice. Extract the Docs folder to this location as well. (In the screenshot, we've extracted to the "D:\Modding\Programs" location.)
- Open Mod Organizer and click the
 icon to open the "Modify Executables" window.
 - In the Title box, type in DynDOLOD.
- In the Binary box, browse to the location of the extracted folder from step 2 above and double-click on DynDOLOD.
- Click [Add] to save the new executable.
- In the title bar again, type in DynDOLOD TexGen.
- In the Binary box, browse to the location of the extracted folder from step 2 above and double-click on TexGen.
- Click [Add] to save the new executable and close the window.

- 2 Extract DynDOLOD

- 3 Open Executables

- 4/#5 Title and browse

- 6 Add DynDOLOD

- 7/#8 Title and browse

- 9 Add DynDOLOD TexGen
DynDOLOD Resource Files
- 1. Download the Resources file from Nexus as normal and install using the following instructions:
WARNING
Template:FOMOD_Instructions is deprecated and should no longer be used on this wiki. Please change this template call to use the better-looking and simpler Template:Fomod. We apologize for the inconvenience.| FOMOD Instructions DynDOLOD Resources |
Main
DynDOLOD Resources
Next Options
Visual Options
Performance Options Select Nothing Misc Options
Install |
- 2. Activate DynDOLOD Resources by ticking it in the left pane.
- 3. Run LOOT.
DynDOLOD Output Files
- In MO's left-pane, right-click on the DynDOLOD Resources mod installed above. Click [Open in explorer].
- Navigate up one level to the "mods" folder.
- Right-click in a blank space. Go to "New", and click [Folder].
- Name the new folder "STEP LOD Textures" or a similar, but unique name.
- Repeat steps 3 and 4 to create another new folder. Name it STEP DynDOLOD Output or a similar, but unique name and close the window.
- Right-click in a blank space in the left pane of MO and click [Refresh]. (You should see the new mods appear at the bottom of the pane.)
- Place them in the order DynDOLOD Resources, followed by STEP LOD Textures, and follow that with STEP DynDOLOD Output.

- 1 Open DynLOD in Explorer

- 2 Go to mods folder

- 3 Create new folder

- 4 Folder is complete

- 5 Second folder is complete

- 6 Refresh the pane

- 7 Order new mods
Generate LODs
- Run DynDOLOD TexGen through MO from the drop-down menu.
- The script will automatically run and you will receive the TexGen window. Keep the original path and click [Start] to run TexGen. When it's finished, click [Exit].
- Find the STEP LOD Textures mod created in step 4 of the DynDOLOD Output Files installation above. Right-click it and select [Open in explore].
- Navigate to the TexGen_Output folder created in step 2 above (e.g., "D:\Modding\Programs\DynDOLOD\TexGen_Output"). Open the folder and drag and drop all the file from the TexGen_Output folder into the STEP LOD Textures folder. Close both folders.
- Activate the new STEP LOD Textures mod. Nothing should overwrite it. (If the mod remains grayed out, it's okay. It will refresh itself.)

- 1 - Run DynDOLOD TexGen

- 2 - Click Start and then Exit

- 3 - Clear Overwrite folder

- 4 - Open LOD Mod

- 5 - Move the files.

- 6 - Activate LOD Textures
Generate DynDOLOD
- Run DynDOLOD through Mod Organizer from the drop-down menu. The script will run automatically.
- Click [OK] on the information window to get to the DynDOLOD Worlds window. One the DynDOLOD Words window, select [Advanced>>>]
- In the Advanced setting window, tick the Candles options. Then in the Select Worlds box, right click and choose [Select all]. Finally, click the [Medium] button.
- The Mesh Rules box will populate. Click [OK] to run DynDOLOD. Sit back and relax for a bit as the script will take between 10 to 25 minutes, on average, to run.
Template:Alert smallTemplate:Alert small - Once the script is done, click [Save & Exit] and then click [OK] to save the new plugin. (If there were errors, seek help on the forums. A link is provided at the top of the page.)
- Find the STEP DynDOLOD Output mod created in step 7 of the DynDOLOD Output Files installation above. Right-click it and select [Open in explore].
- Navigate to the DynDOLOD_Output folder created in step 4 above (e.g., "D:\Modding\Programs\DynDOLOD\DynDOLOD_Output"). Open the folder and drag and drop all the files and folders from the DynDOLOD_Output folder into the STEP DynDOLOD Output folder. Close both folders.
- Activate the new STEP DynDOLOD Output mod (nothing should overwrite it). Make sure DynDOLOD.esp is enabled in the Plugins tab and run LOOT.
Congratulations! You have successfully installed DynDOLOD!
NOTE
Make sure that the DynDOLOD Output ...Meshes/Textures/SKSE (Json files) are not overwritten by other mods, especially not by mods that come with their own tree LOD.

- 1 Run DynDOLOD

- 2 Advanced Option

- 3 Select Options

- 6 Open Output Mod

- 7 Move files

- 8 Active and run LOOT